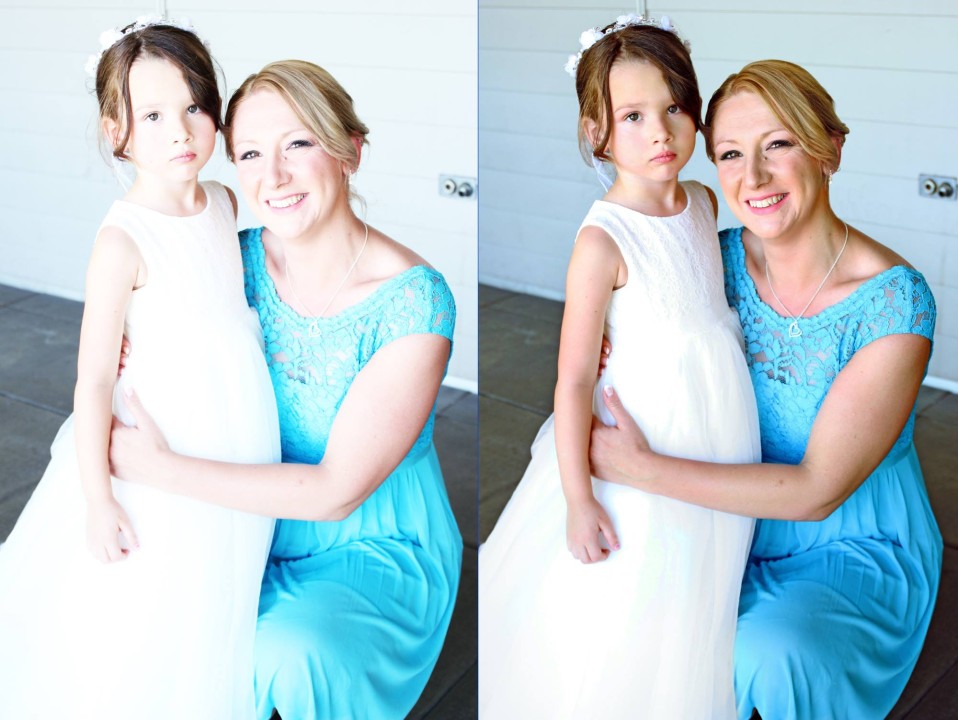
What can cause exposure errors?
Anyone who has tried to take a photo on a very sunny day is familiar with the Overexposed photo or darkening of the photo. This is expressed in incorrect exposure of the frame, which is often made by inexperienced photographers. That’s why we we turn to a Photoshop expert to fix overexposed photo. First You need to know how to prevent these defects in order to improve your skills. Let’s look at what typical exposure errors are, what causes them, and whether they can be corrected.
Overexposed photo: It’s best to avoid them before releasing the shutter. Of course, you should always be prepare for the fact that you will need to experiment with camera settings while shooting. But it’s better to know in which situations it will take more time. Therefore, we will analyze difficult cases that can provoke exposure errors:
Darkened background:
If the subject is placed against a background of a dark color, for example when creating a portrait, then there is a high probability that the camera will not perceive the true shade and will create an error. Thus, the background can become much lighter, and accordingly, the object will be overexposed. In this situation, you should lower the exposure a couple of values;
Dark object:
This situation is similar to the first one. If, for example, you photograph a girl in a black dress. The result may also be an overexposed photo. And the solution here is the same – reduce the exposure value;
Light background:
Shooting something against a well-lit background is one of the most challenging situations. If the object is located against the background of the sun, for example, then the technique will create an error in automatic mode. The subject in this case will be very shadow. To prevent this, do the exposure correction of the frame yourself;
Light object:
It is not easy for the technique to distribute the light well in a photograph, both with a bright background and with a light color of the subject, which is why an error occurs. Therefore, in this case, the subject will turn out to be overexpose, and, as in other cases, it is recommend to lower the exposure;
Shooting in front of a light source:
No matter how hard you try, sometimes you have to work in such conditions in order to realize your idea. In fact, you can get some very interesting photos by shooting in front of a bright light source. But with this arrangement of the light flux, the equipment cannot cope with the exposure settings for such a frame, so an error is inevitable. In such a situation, you will most likely have to significantly increase the exposure in the photo, depending on the strength of the light;
High contrast:
When shooting a frame with a strong difference between dark and light, for example, on a sunny day, you will have to make a choice which area to prioritize. It all depends on which area is most important and where you want to show more detail. After the choice is made, it is necessary to measure the parameters for this area. The photograph, most likely, will not be perfect in its entirety and mistakes cannot be avoided, but important details will not be lost. Of course, these are not all cases when the camera automatically cannot cope with the settings. There are an infinite number of them, it’s impossible to list them all, so you need to practice your skills and always be ready to solve mistakes on your own.
What is The way to fix it overexposed photos in photoshop?
Fix overexposed photo in Photoshop can be achieved using various techniques, depending on the specific characteristics of the overexposure. And if you know how to use Photoshop properly, you can easily fix overexposed photo. Here’s a general guide that you can follow:
Open the Overexposed Photo: Launch Adobe Photoshop and open the overexposed photo.
Adjustment Layers: Use Adjustment Layers to make non-destructive changes. Click on the “New Adjustment Layer” icon at the bottom of the Layers panel and choose the appropriate adjustment layer based on your needs.
Levels Adjustment: The Levels adjustment is useful for adjusting the brightness and contrast of an image. Go to Image > Adjustments > Levels. In the Levels dialog box, move the sliders for Input Levels to adjust the overall brightness and contrast.
Exposure Adjustment:
Another option is the Exposure adjustment for fine-tuning exposure. Go to Image > Adjustments > Exposure. Adjust the Exposure, Offset, and Gamma Correction sliders to balance the exposure.
Curves Adjustment: The Curves adjustment allows precise control over tonal values. Go to Image > Adjustments > Curves . Adjust the curve to control highlights, midtones, and shadows.
Highlights and Shadows: Use the Highlights and Shadows adjustment to recover details in overexposed areas. Go to Image > Adjustments > Shadows/Highlights. Adjust the sliders to recover details in the highlights and shadows.
Color Correction: Overexposure can affect color balance. Use the Color Balance adjustment to correct it. Go to Image > Adjustments > Color Balance. Adjust the sliders to correct the color balance.
Clone Stamp/Healing Brush: If there are specific blown-out areas, use the Clone Stamp or Healing Brush tools to sample nearby pixels and paint over the blown-out areas.
Gradient Filter:Apply a gradient filter selectively to adjust exposure in specific areas.Use the Gradient tool and apply it as an adjustment layer.
Dodge and Burn:Use the Dodge tool to lighten underexposed areas and the Burn tool to darken overexposed areas selectively.
Sharpening:Overexposed images might look softer. Apply sharpening selectively using the Unsharp Mask filter (Filter > Sharpen > Unsharp Mask).
Save Your Work: Always save your edited image with a new name to preserve the original.
Experiment with these adjustments and tools to find the combination that works best for your specific overexposed photo. Keep in mind that subtle adjustments often yield more natural-looking results.
