Why Photoshop software is important for editing your photos
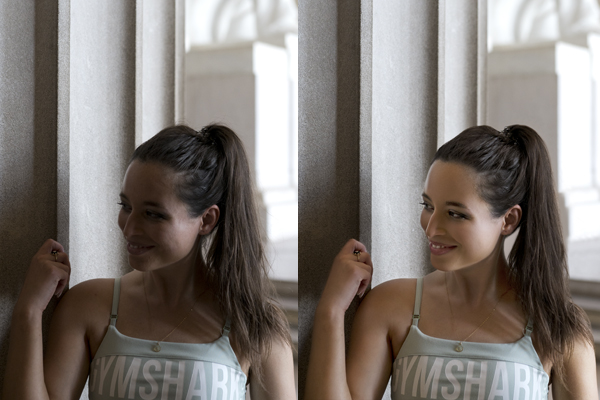
Amidst the rapid advancements of modern technology, a photo is not just a snapshot of a moment—it is an expression of personality, professionalism, and creativity. Whether it’s social media, e-commerce, portfolio, or personal branding—a perfect, eye-catching photo can instantly capture the attention of the viewer. However, not all photos come out of the camera exactly the way we want them to. That’s where Photoshop photo editing plays a vital role. This powerful technique allows users to enhance, retouch, and transform images to match their vision and purpose. To solve the common issues found in raw images—such as lighting imbalances, background distractions, or skin imperfections—professionals and creatives around the world rely on one of the most effective and popular software tools available today: Adobe Photoshop. Photoshop is a tool that makes photo editing professional and perfect. If you want to present an ordinary photo in an extraordinary way, then there is no alternative to Photoshop. Through it, you can easily control the light, shadow, contrast, color, etc. of the photo. Even changing the background of the photo, removing unwanted parts, smoothing the skin, photo retouching and much more are possible very easily. Photoshop is an essential software, especially for photographers, graphic designers, digital marketers, and e-commerce businesses. Because good photos mean good impressions, and good impressions mean customer trust and confidence. So, Photoshop is not just a photo editing software—it is a powerful tool to improve the quality of your photos. If you want your photos to be more attractive, professional, and captivating, then using Photoshop will be your best decision. How Photoshop makes an ordinary photo extraordinary A picture can express more than a thousand words. But not all pictures come out of the camera lens as perfectly as we want. Sometimes the light in the picture is low, the background is messy, spots on the face or unnecessary objects are visible. At this stage, a powerful and efficient photo editing tool is needed, which is called Adobe Photoshop . Photoshop is a software that can transform even a simple, ordinary quality photo into a professional, attractive and artistic photograph. Using its various tools and features, every subtle aspect of the photo, including color, contrast, brightness, saturation, can be perfectly adjusted. This brings the photo back to life. Photoshop can be used to enhance your beauty by removing acne, blemishes, or wrinkles. It is possible to change the background, remove unwanted objects, adjust light and shadow, and even add completely new objects to the image. All of these can transform an ordinary photo into a completely new look—attractive, professional, and eye-catching. From personal photos to business product photography, from social media content to digital marketing—Photoshop is incredibly important in every field. Because a beautiful photo means more attention, more focus, and therefore more opportunities. In other words, Photoshop is not just an editing software, it is a powerful tool for creativity and perfect presentation, which makes an ordinary photo extraordinary. Using Photoshop to remove or change the background In an increasingly technology-driven world, the beauty and professionalism of a photo largely depends on its background. Just as a perfect background can make a photo more attractive, a messy or unnecessary background can ruin the beauty of the entire photo. It is at this point that Adobe Photoshop gives us a wonderful solution—the ability to remove or change the background. With the help of Photoshop, you can easily remove the background of a photo while retaining the main subject or add a new background as desired. This brings innovation, professionalism, and visual appeal to the presentation of the photo. Changing the background is an important step, especially in creating e-commerce, fashion photography, product catalogs, portfolios, or social media posts. Background cutting or changing can be done accurately using various tools in Photoshop such as Pen Tool, Quick Selection Tool, Remove Background Option, Layer Mask , etc. If you want, you can add a natural background, a monochrome background, or a fully designed graphic background to the back of the image. These actions not only make the image visually appealing, but they also increase the viewer’s interest and trust in your brand, presentation, or product. So, it can be said that Photoshop’s background removal or modification feature makes an ordinary photo look extraordinary and professional. This feature can take your photo to a new level. Photoshop to improve the quality of e-commerce product photos Nowadays, e-commerce business is growing at a huge rate. The first thing a customer sees while shopping online is the product image . A clear, professional and attractive image plays a huge role in increasing the sales of a product. But most of the time, raw images are not directly usable. This is where Adobe Photoshop becomes an indispensable tool. Photoshop can be used to edit e-commerce product photos to make them look professional, bright, and believable. You can remove the background and use a solid or transparent background, which increases the focus of the product. You can add shadows to give the product a more realistic and premium look. In addition, color correction, exposure adjustment, scratch or dust removal, and adjusting the angle or composition of the photo are also easily possible with Photoshop. Especially on e-commerce platforms like Amazon, eBay, Daraz, or Shopify that have specific image guidelines, the use of Photoshop becomes essential to comply with them. Because good quality images not only increase sales, but also demonstrate the buyer’s trust and professionalism in the brand. A properly edited product photo encourages buyers to buy with confidence, while a bad photo can discourage them from buying. Therefore, it goes without saying how profound the importance of Photoshop in improving the quality of product photos is for the success of e-commerce businesses. Perfect photoshop photo editing for social media posts In the age of social media, an attractive image or visual content can be the biggest identity of your personality, brand or product. Whether it’s Facebook, Instagram, TikTok, Pinterest or LinkedIn—the visual quality of an image or post is